Sunday, June 12, 2011

WAD Practical 2 - Develop a Customer Registration form using JSTL


Practical


Objectives
After completing this practical, you should be able to
  • Independently try out other example codes that come with the book and duplicate the examples in your WADprac project.
  • Understand what scope variables are.
  • Understand how to use include page directives.
  • Able to access Application Data.
  • Able to access Forms Data
Exercise 1 -- Duplicate the example codes in the WADprac project.

Fig 1.1: Created new folder 'pract2'.

First, we create a new folder in the practicals folder called 'pract2'.

Fig 1.2: Copied the contents of countJSTL.jsp to a new jsp file in pract2

Now, we'll copy the contents of countJSTL.jsp from chapter one of the examples into a newly created p2ex1.jsp in the pract2 folder.


Fig 1.3: Results!


Running it yields a page enumerating the range 1 to 10, as before.

Exercise 2 -- In this exercise, you will create a new folder and explore how to copy an existing file as well as testing out some simple logics.


Fig 2.1: Copy'd and Paste'd.

So we make a copy of p2ex1.jsp, and we paste it in the pract2 folder as p2ex2.jsp.

Fig 2.2: Modified JSP.

We make a few modifications to fit the output we are required to conform to.

Fig 2.3: Running the JSP.

Voila!

Exercise 3 -- In this exercise, you will modify the available codes and dynamically create a 2 and 5 times-table.

Now, we're required to write a JSP page to output the 2 and 5 times-tables in the form of a HTML table using the for loop construct of JSP.

Fig 3.1: JSP

Fig 3.2: Result

So let's just go ahead and write it.

Exercise 4 -- In this exercise, you will explore the bkExamples, ch2, to understand Scope Variables.

Fig 4.1: Running index.html

We're going to go ahead and run the file index.html in ch2 of the examples.

Fig 4.2: index.html

The index of the page is shown. Let us proceed to Listing 2.1 - Main Example Page.


Fig 4.3: Listing 2.1 - Main Example Page

As you can see, the Page Scope is blank in the second table. This is because it is an included page and does not have access to the pageContext.

Now, we are required to provide the following answers:

  1. There is a blank under the second table because the table is an included page that does not have access to the implicit pageContext.
  2. When a variable is set using an action, the default scope the variable is bound to is 'page'.
  3. Request level scopes exist only for the duration the request exists. That begins when the request object is created by the web container and ends when the object is terminated when the data is transmitted. In this case, the included page does not have the request value because the linked page is a second request and hence loses the previous bindings.
  4. The session scope variable remains intact during the whole duration of when the session is active. A session is designated to a user to identify him for stateful operations.
  5. Session scope variables can be used to keep track of a logged in user.
  6. Application scope variables are GLOBAL.
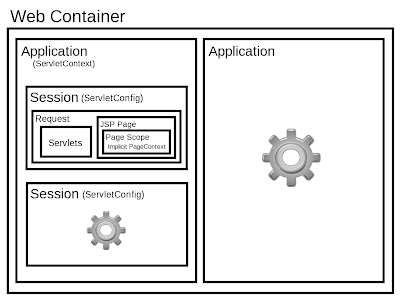
Fig 4.4: Scope diagram.

This diagram summarizes the restrictiveness of each scope and the bindings of the scopes to the variables.

Exercise 5 -- In this exercise, you will explore the bkExamples, ch2, to understand one of the ways of accessing Form data through the use of paramValues Collection.

Fig 5.1: Listing 2.5 with its forms filled out.

We run index.html and click on Listing 2.5.

Fig 5.2: The results of the form submitted.

Now, we can answer the questions:

  1. 2 pages are involved: params1.html and params2.jsp.
  2. params1.html contains the form which crafts the HTTP request. params2.jsp contains the server-side logic.
  3. The request from the client crafted in params1.html is in the form of a POST method. The params2.jsp logic uses a foreach loop on paramValues to extract the key and values of the map.
  4. The purpose of the paramValues collection is to hold the information passed in a GET or POST request.
Fig 5.3: Copied the files into the practical folder.

Right now, we copy the two files, params1.html and params2.jsp into our practical folders and rename them as p2ex5.html and p2ex5.jsp respectively for modification and further investigation.

Fig 5.4: Modified p2ex5.html HTML file.

We modify p2ex5.html by adding a set of radio buttons for a 'Nationality' parameter and changing the method to GET. We fill in the form and hit submit.

Fig 5.5: Results.

We notice that the nationality field is added and that the URL of the page is much longer than the one with the POST method. This is because GET request have name value pairs appended onto the URL instead of in the HTTP request header.


Well, we're done for Practical 2.
You stay frosty, San Diego.

Sine Cera,
Jeremy

Thursday, June 9, 2011

WAD Practical 1 - Setting up the Web Applications Development Environment


Practical 

Activities:
§         Get the NetBeans Web applications development environment ready for the rest of the practical sessions.
§         Try out example codes that come with the NetBeans IDE tool.
§         Set up the same development environment at home or anywhere else when required.
§         Try out the example codes that accompany the Text Book “JSTL: JSP Standard Tag Library Kick Start” by Jeff Heaton, SAMs Publishing.
§         Test out the usefulness of a simple dynamic Web application.

Exercise 1: Installing the Web Application Development Tool -- Netbeans IDE 6.8 into your home computer or notebook.

We skip this because Netbeans, Java EE, Glassfish, and Tomcat are already installed and running fine from previous projects.

Exercise 2: Get started with the Netbeans IDE 6.8 Web Applications Development environment.


Fig 2.1: We create a new project ('WADPracticals').


Fig 2.2: Google Code vxtherael repository.
I imported the newly created project into my Google Code repository because I want to be able to work on it across computers and my dual booted computer (Windows is really terrible for detecting Linux partitions out of the box.)

Exercise 3: Test the Netbeans IDE and run the first web application (JSP page) using JSTL.


Fig 3.1: So we've created the project. Now we take a look at the index.jsp file created for us.

Looking at the index.jsp file in the Netbeans project, we can, right off the bat, see that Netbeans generates a 'Hello World' sample in the JSP form. Apart from the few minor foreign-looking tags (e.g. <%), it looks identical to HTML.

So to answer the questions required:
  1. The JSP generated prints 'Hello World!' to the client's browser.
  2. The '<%-- ... --%>' tags denote a comment.

Fig 3.2: We make a few changes to the index.jsp

Now, we make a few changes to the index.jsp. Namely, we added a JSTL core taglib with the prefix 'c' along with an if statement to check if the parameter 'sayHello' is true and if it is, to print a message greeting the user (with the application of the name parameter).


Fig 3.3: Running the file right off will return a blank screen.

Fig 3.4: Source code of Fig 3.3. Compare this to Fig 3.2.


We run the file index.jsp by right clicking the file in the projects tab and clicking 'Run file'. I had to manually add the JSTL 1.1 library to the project classpath manually in Netbeans 6.9. Once the database and the web container starts up, the page will appear in your web browser. Don't worry if its a blank page, its meant to be that way.

Now, we have to answer a few required questions:
  1. The port number that the browser sent the request to is 8080.
  2. The context path is /WADPracticals/index.jsp.
  3. The resource requested is 'index.jsp'.
  4. When comparing the source code of the generated file on the browser, we see that quite a few elements present in the JSP page is not in the HTML file returned. For example, we do not see the taglib declaration nor the if statements.

Fig 3.5: Adding the proper query string allows us to view the 'hidden message'!


Let's see if we can get that message to appear... now, to do that, we've got to append a query string of the right sort. We know that the JSP does a check against the parameter sayHello to decide whether to display the <h2> content and prints the name parameter within that. So I've crafted the query string '&sayHello=true&name=Jeremy' to get the page to return Fig 3.5.

Exercise 4 - Run the examples from the companion web site of the recommended text book, “JSTL: JSP Standard Tag Library Kick Start” by Jeff Heaton from SAMs Publishing

Fig 4.1: index.jsp of chapter 1 of the examples.

I merged the files from the examples from the book JSTL: JSP Standard Tag Library Kick Start with the project I created.

Fig 4.2: The running of Fig 4.1.

Fig 4.3: With the exception of Coldfusion, all four options display identical results.

These four options, if the respective technologies are installed, enumerate the numbers one to ten in a web page.

We have to answer the following questions:
  1. We observe an enumeration of the numbers one to ten in a web page.
  2. The results are consistent with exception of the ColdFusion web page.
  3. ColdFusion is not installed on the web server hence the desired output is not printed.
We also observe the following things:
  1. The folder containing the sources are 'src' for the java files and 'web' for the views.
  2. The name of the war file generated is 'WADPracticals.war'.
  3. My project is deployed to the Glassfish server.

Exercise 5 - In this exercise, you create a new folder and label it pract1 in the WADprac project.

Fig 5.1: p1ex1.jsp

We've copied the code out of the practical sheet into a new file p1ex1.jsp.

Fig 5.2: Running the p1ex1.jsp.

Running it yields a page with a form to fill in.

Fig 5.3: Filling in the form


We've filled in the form and submitted it. Notice that the time corresponds to the time on the server.


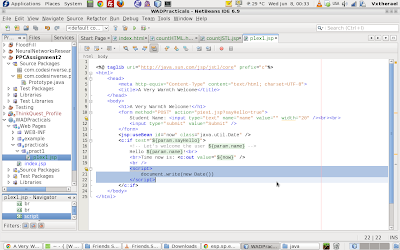
Fig 5.4: Added javascript script to the JSP.


Fig 5.5: Comparison between server-side time and client-side time.

We add a small javascript script to display the time from the client side. Since the server and the client is the same (my computer), the time difference is very very minimal and hence, the times reflected are the same.


Exercise 6: In this exercise, you create a new JSP page to display the current time at the client side dynamically, and server side time upon requesting.

Fig 6.1: Dynamic JSP page to display client and server side time plus a name.

We've created the JSP page as per specification in the practical sheet.

Fig 6.2: Running of the JSP page just created.
Running it yields a page asking for the client side time, and a name. (Fig 6.2)

Fig 6.3: Sending the POST request to the server.
Filling in the form and submitting it returns a brief welcome, as well as the server side time.

Exercise 7 - Last But not the Least ! Task to do : Turn off the automatic web page caching feature from your web browser.
Honestly, I ignored this step. Using ctrl-f5 is fine for me.

So that's it for the first WAD practical on this blog.
Stay frosty, San Diego.

Sine Cera,
Jeremy

Sunday, June 5, 2011

Web Application Development Notice


From this point onwards, this blog can be used to document the WEB APPLICATIONS DEVELOPMENT (ST2217) Practicals with the tag 'wad'.

Friday, August 27, 2010

Hands-On Project 11-3 (Page 396)


Objective ad Verbatim:

“As an alternative to EFS, third party applications can also be downloaded to protect files with cryptography. In this project, you will download and install TrueCrypt.” (Ciampa, 2009)

Process:

1. The first step was to download TrueCrypt at truecrypt.org and install it.


2. Next, I opened up TrueCrypt and created a new volume.


3. I chose to create a simple encrypted file container. This option creates a file containing the encrypted drive information on your hard drive or removable material.


4. Then, I selected the ‘Standard TrueCrypt Volume’.


5. On the next page, I was directed to pick which encryption and hash algorithm I wanted. I stuck to the default settings.


6. Next, I set the volume size to 1 MB.


7. Then, I set up my password to access the encrypted volume.


8. On the Volume Format page, things got interesting. I was directed to wiggle my mouse about inside the window in a random fashion to generate the random pool to increase the cryptographic strength of the encryption keys. After, waving my mouse about for what seemed to be a sufficient time, I clicked Format.


9. It then informed me that the volume was created successfully.


10. Now, to access the Encrypted Volume I just created, I had to click Exit and return to the main page. Clicking on a random drive letter, I pressed Mount and entered in my volume password.


11. Following the instructions in the book, I created a Word document containing a considerable amount of text. I titled it Truecrypt Encrypted.docx.


12. Opening up My Computer, I checked that the encrypted drive was mounted and saved a duplicate of my TrueCrypt Encrypted.docx in the drive. First, I opened the file outside of the encrypted drive to get a vague estimate on how long an unencrypted file takes to open. Then, I opened the encrypted file. Oddly enough and contrary to intuition, there was not much difference between the two file reads.


Reflection:

I’ll cover the finer points and issues with privacy and encryption in another post to keep this post oriented towards what I perceive this exercise to represent.

From this hands-on project, TrueCrypt is demonstrated to be extremely easy to use with a rather high level of security in terms of cryptographic protection. More particularly, this allows casual computer users to have the same standard of protection available to large organisations such as banks in a user-friendly package. The method of using a file as a container for the drive means that steganography can be employed to hide the drive in a field of innocent files. Also, it creates an easy to transport style, i.e. simply by copying or cutting the file into an external device.

Now if we explore the other features of TrueCrypt, we discover we can create a hidden container within a container. This drive within a drive system works like so: When a user inputs the password for the outer drive, TrueCrypt mounts the decoy (outer) drive. However, when the password for the hidden (inner) drive is used, TrueCrypt reveals the secret drive. This hidden drive is practically invisible when examined via forensics or when the password for the outer drive is supplied. This is particularly useful when a password is extracted from a user via rubber hose cryptanalysis or the user is required by the law to supply one. The attacker will access the decoy drive and will merely view what the user wants the attacker to see. This protection is called ‘Plausible Deniability’.

Sine Cera,
Jeremy Heng.

"Quis custodiet ipsos custodes?"

Hands-On Project 11.3 Sources