

Objectives
After completing this practical, you should be able to
- Independently try out other example codes that come with the book and duplicate the examples in your WADprac project.
- Understand what scope variables are.
- Understand how to use include page directives.
- Able to access Application Data.
- Able to access Forms Data
Exercise 1 -- Duplicate the example codes in the WADprac project.
 |
| Fig 1.1: Created new folder 'pract2'. |
First, we create a new folder in the practicals folder called 'pract2'.
 |
| Fig 1.2: Copied the contents of countJSTL.jsp to a new jsp file in pract2 |
Now, we'll copy the contents of countJSTL.jsp from chapter one of the examples into a newly created p2ex1.jsp in the pract2 folder.
 |
| Fig 1.3: Results! |
Running it yields a page enumerating the range 1 to 10, as before.
Exercise 2 -- In this exercise, you will create a new folder and explore how to copy an existing file as well as testing out some simple logics.
 |
| Fig 2.1: Copy'd and Paste'd. |
So we make a copy of p2ex1.jsp, and we paste it in the pract2 folder as p2ex2.jsp.
 |
| Fig 2.2: Modified JSP. |
We make a few modifications to fit the output we are required to conform to.
 |
| Fig 2.3: Running the JSP. |
Voila!
Exercise 3 -- In this exercise, you will modify the available codes and dynamically create a 2 and 5 times-table.
Now, we're required to write a JSP page to output the 2 and 5 times-tables in the form of a HTML table using the for loop construct of JSP.
 |
| Fig 3.1: JSP |
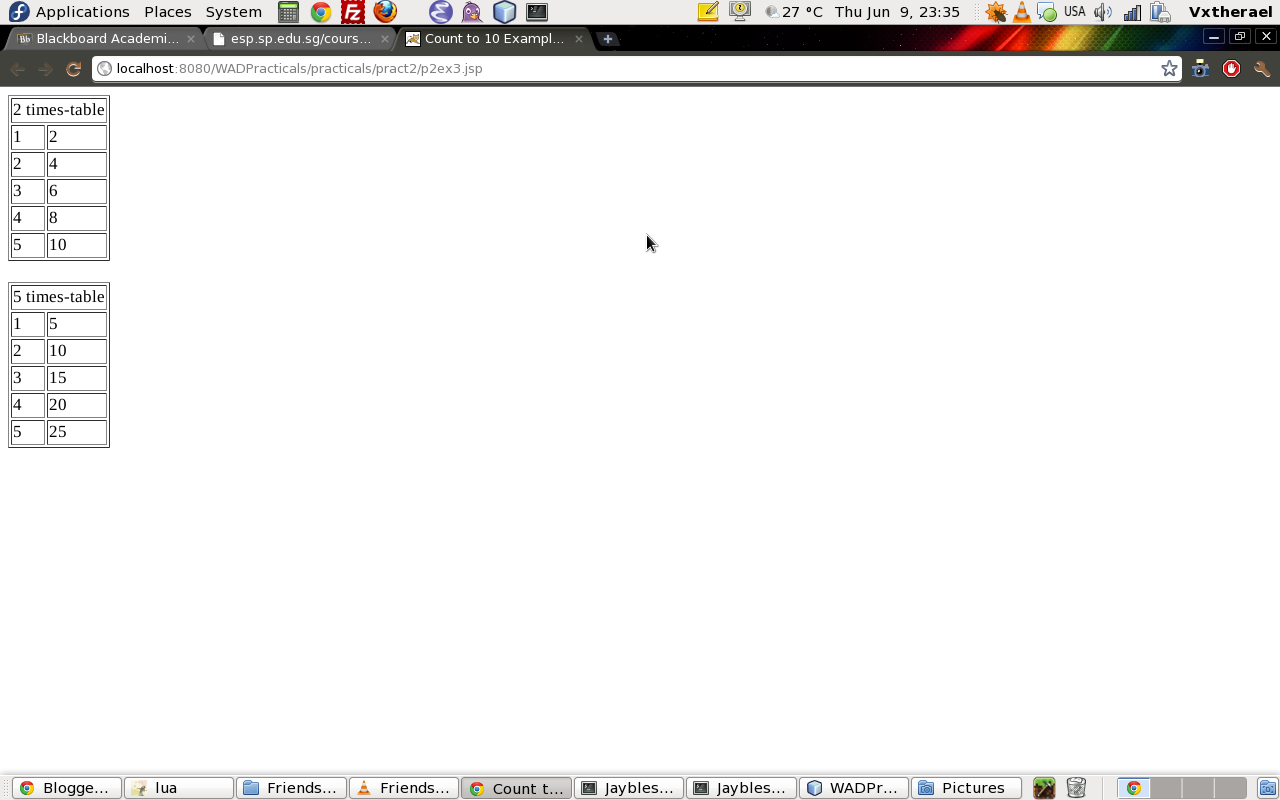 |
| Fig 3.2: Result |
So let's just go ahead and write it.
Exercise 4 -- In this exercise, you will explore the bkExamples, ch2, to understand Scope Variables.
 |
| Fig 4.1: Running index.html |
We're going to go ahead and run the file index.html in ch2 of the examples.
 |
| Fig 4.2: index.html |
The index of the page is shown. Let us proceed to Listing 2.1 - Main Example Page.
 |
| Fig 4.3: Listing 2.1 - Main Example Page |
As you can see, the Page Scope is blank in the second table. This is because it is an included page and does not have access to the pageContext.
Now, we are required to provide the following answers:
This diagram summarizes the restrictiveness of each scope and the bindings of the scopes to the variables.
Exercise 5 -- In this exercise, you will explore the bkExamples, ch2, to understand one of the ways of accessing Form data through the use of paramValues Collection.
We run index.html and click on Listing 2.5.
Now, we can answer the questions:
Now, we are required to provide the following answers:
- There is a blank under the second table because the table is an included page that does not have access to the implicit pageContext.
- When a variable is set using an action, the default scope the variable is bound to is 'page'.
- Request level scopes exist only for the duration the request exists. That begins when the request object is created by the web container and ends when the object is terminated when the data is transmitted. In this case, the included page does not have the request value because the linked page is a second request and hence loses the previous bindings.
- The session scope variable remains intact during the whole duration of when the session is active. A session is designated to a user to identify him for stateful operations.
- Session scope variables can be used to keep track of a logged in user.
- Application scope variables are GLOBAL.
 |
| Fig 4.4: Scope diagram. |
This diagram summarizes the restrictiveness of each scope and the bindings of the scopes to the variables.
Exercise 5 -- In this exercise, you will explore the bkExamples, ch2, to understand one of the ways of accessing Form data through the use of paramValues Collection.
 |
| Fig 5.1: Listing 2.5 with its forms filled out. |
We run index.html and click on Listing 2.5.
 |
| Fig 5.2: The results of the form submitted. |
Now, we can answer the questions:
- 2 pages are involved: params1.html and params2.jsp.
- params1.html contains the form which crafts the HTTP request. params2.jsp contains the server-side logic.
- The request from the client crafted in params1.html is in the form of a POST method. The params2.jsp logic uses a foreach loop on paramValues to extract the key and values of the map.
- The purpose of the paramValues collection is to hold the information passed in a GET or POST request.
 |
| Fig 5.3: Copied the files into the practical folder. |
Right now, we copy the two files, params1.html and params2.jsp into our practical folders and rename them as p2ex5.html and p2ex5.jsp respectively for modification and further investigation.
 |
| Fig 5.4: Modified p2ex5.html HTML file. |
We modify p2ex5.html by adding a set of radio buttons for a 'Nationality' parameter and changing the method to GET. We fill in the form and hit submit.
 |
| Fig 5.5: Results. |
We notice that the nationality field is added and that the URL of the page is much longer than the one with the POST method. This is because GET request have name value pairs appended onto the URL instead of in the HTTP request header.
Well, we're done for Practical 2.
You stay frosty, San Diego.
Sine Cera,
Jeremy


